
Domain-Specific Languages
1. Command chains
Groovy lets you omit parentheses around the arguments of a
method call for top-level statements. "command chain" feature extends this by allowing us to chain such
parentheses-free method calls, requiring neither parentheses around arguments, nor dots between the chained calls.
The general idea is that a call like a b c d will actually be equivalent to a(b).c(d). This
also works with multiple arguments, closure arguments, and even named arguments. Furthermore, such command chains can
also appear on the right-hand side of assignments. Let’s have a look at some examples
supported by this new syntax:
// equivalent to: turn(left).then(right)
turn left then right

// equivalent to: take(2.pills).of(chloroquinine).after(6.hours)
take 2.pills of chloroquinine after 6.hours

// equivalent to: paint(wall).with(red, green).and(yellow)
paint wall with red, green and yellow

// with named parameters too
// equivalent to: check(that: margarita).tastes(good)
check that: margarita tastes good

// with closures as parameters
// equivalent to: given({}).when({}).then({})
given { } when { } then { }
It is also possible to use methods in the chain which take no arguments, but in that case, the parentheses are needed:
// equivalent to: select(all).unique().from(names)
select all unique() from names
If your command chain contains an odd number of elements, the chain will be composed of method / arguments, and will finish by a final property access:
// equivalent to: take(3).cookies
// and also this: take(3).getCookies()
take 3 cookies
This command chain approach opens up interesting possibilities in terms of the much wider range of DSLs which can now be written in Groovy.
The above examples illustrate using a command chain based DSL but not how to create one. There are various strategies that you can use, but to illustrate creating such a DSL, we will show a couple of examples - first using maps and Closures:
show = { println it }
square_root = { Math.sqrt(it) }

def please(action) {
  [the: { what ->
    [of: { n -> action(what(n)) }]
  }]
}

// equivalent to: please(show).the(square_root).of(100)
please show the square_root of 100
// ==> 10.0
As a second example, consider how you might write a DSL for simplifying
one of your existing APIs. Maybe you need to put this code in front of
customers, business analysts or testers who might be not hard-core Java
developers. We’ll use the Splitter from the Google
Guava libraries project as it
already has a nice Fluent API. Here is how we might use it out of the
box:
@Grab('com.google.guava:guava:r09')
import com.google.common.base.*
def result = Splitter.on(',').trimResults(CharMatcher.is('_' as char)).split("_a ,_b_ ,c__").iterator().toList()
It reads fairly well for a Java developer but if that is not your target audience or you have many such statements to write, it could be considered a little verbose. Again, there are many options for writing a DSL. We’ll keep it simple with Maps and Closures. We’ll first write a helper method:
@Grab('com.google.guava:guava:r09')
import com.google.common.base.*
def split(string) {
  [on: { sep ->
    [trimming: { trimChar ->
      Splitter.on(sep).trimResults(CharMatcher.is(trimChar as char)).split(string).iterator().toList()
    }]
  }]
}
now instead of this line from our original example:
def result = Splitter.on(',').trimResults(CharMatcher.is('_' as char)).split("_a ,_b_ ,c__").iterator().toList()we can write this:
def result = split "_a ,_b_ ,c__" on ',' trimming '_\'2. Operator overloading
Various operators in Groovy are mapped onto regular method calls on objects.
This allows you to provide your own Java or Groovy objects which can take advantage of operator overloading. The following table describes the operators supported in Groovy and the methods they map to.
| Operator | Method |
|---|---|
|
a.plus(b) |
|
a.minus(b) |
|
a.multiply(b) |
|
a.power(b) |
|
a.div(b) |
|
a.mod(b) |
|
a.or(b) |
|
a.and(b) |
|
a.xor(b) |
|
a.next() |
|
a.previous() |
|
a.getAt(b) |
|
a.putAt(b, c) |
|
a.leftShift(b) |
|
a.rightShift(b) |
|
a.rightShiftUnsigned(b) |
|
b.isCase(a) |
|
a.asBoolean() |
|
a.bitwiseNegate() |
|
a.negative() |
|
a.positive() |
|
a.asType(b) |
|
a.equals(b) |
|
! a.equals(b) |
|
a.compareTo(b) |
|
a.compareTo(b) > 0 |
|
a.compareTo(b) >= 0 |
|
a.compareTo(b) < 0 |
|
a.compareTo(b) <= 0 |
3. Script base classes
3.1. The Script class
Groovy scripts are always compiled to classes. For example, a script as simple as:
println 'Hello from Groovy'is compiled to a class extending the abstract groovy.lang.Script class. This class contains a single abstract
method called run. When a script is compiled, then its body will become the run method, while the other methods
found in the script are found in the implementing class. The Script class provides base support for integration
with your application through the Binding object, as illustrated in this example:
def binding = new Binding()             (1)
def shell = new GroovyShell(binding)    (2)
binding.setVariable('x',1)              (3)
binding.setVariable('y',3)
shell.evaluate 'z=2*x+y'                (4)
assert binding.getVariable('z') == 5 (5)| 1 | a binding is used to share data between the script and the calling class |
| 2 | a GroovyShell can be used with this binding |
| 3 | input variables are set from the calling class inside the binding |
| 4 | then the script is evaluated |
| 5 | and the z variable has been "exported" into the binding |
This is a very practical way to share data between the caller and the script, however it may be insufficient or not practical in some cases. For that purpose, Groovy allows you to set your own base script class. A base script class has to extend groovy.lang.Script and be a single abstract method type:
abstract class MyBaseClass extends Script {
    String name
    public void greet() { println "Hello, $name!" }
}
Then the custom script base class can be declared in the compiler configuration, for example:
def config = new CompilerConfiguration()                                (1)
config.scriptBaseClass = 'MyBaseClass'                                  (2)
def shell = new GroovyShell(this.class.classLoader, config)             (3)
shell.evaluate """
    setName 'Judith'                                                    (4)
    greet()
"""| 1 | create a custom compiler configuration |
| 2 | set the base script class to our custom base script class |
| 3 | then create a GroovyShell using that configuration |
| 4 | the script will then extend the base script class, giving direct access to the name property and greet method |
3.2. The @BaseScript annotation
As an alternative, it is also possible to use the @BaseScript annotation directly into a script:
import groovy.transform.BaseScript

@BaseScript MyBaseClass baseScript
setName 'Judith'
greet()
where @BaseScript should annotate a variable which type is the class of the base script. Alternatively, you can set
the base script class as a member of the @BaseScript annotation itself:
@BaseScript(MyBaseClass)
import groovy.transform.BaseScript

setName 'Judith'
greet()
When using the special no-args run method, you can even annotate
that method as shown here:
abstract class CustomScript extends Script {
    int getTheMeaningOfLife() { 42 }
}

@BaseScript(CustomScript)
def run() {
    assert theMeaningOfLife == 42
}
3.3. Alternate abstract method
We have seen that the base script class is a single abstract method type that needs to implement the run method. The
run method is executed by the script engine automatically. In some circumstances it may be interesting to have a base
class which implements the run method, but provides an alternative abstract method to be used for the script body.
For example, the base script run method might perform some initialization before the run method is executed. This
is possible by doing this:
abstract class MyBaseClass extends Script {
    int count
    abstract void scriptBody()                              (1)
    def run() {
        count++                                             (2)
        scriptBody()                                        (3)
        count                                               (4)
    }
}| 1 | the base script class should define one (and only one) abstract method |
| 2 | the run method can be overridden and perform a task before executing the script body |
| 3 | run calls the abstract scriptBody method which will delegate to the user script |
| 4 | then it can return something else than the value from the script |
If you execute this code:
def result = shell.evaluate """
    println 'Ok'
"""
assert result == 1
Then you will see that the script is executed, but the result of the evaluation is 1 as returned by the run
method of the base class. It is even clearer if you use parse instead of evaluate, because it would allow you to
execute the run method several times on the same script instance:
def script = shell.parse("println 'Ok'")
assert script.run() == 1
assert script.run() == 2
4. Adding properties to numbers
In Groovy number types are considered equal to any other types. As such, it is possible to enhance numbers by adding properties or methods to them. This can be very handy when dealing with measurable quantities for example. Details about how existing classes can be enhanced in Groovy are found in the extension modules section or the categories section.
An illustration of this can be found in Groovy using the TimeCategory:
use(TimeCategory) {
    println 1.minute.from.now       (1)
    println 10.hours.ago

    def someDate = new Date()       (2)
    println someDate - 3.months
}| 1 | using the TimeCategory, a property minute is added to the Integer class |
| 2 | similarly, the months method returns a groovy.time.DatumDependentDuration which can be used in calculus |
Categories are lexically bound, making them a great fit for internal DSLs.
5. @DelegatesTo
5.1. Explaining delegation strategy at compile time
@groovy.lang.DelegatesTo is a documentation and compile-time annotation aimed at:
-
documenting APIs that use closures as arguments
-
providing type information for the static type checker and compiler
The Groovy language is a platform of choice for building DSLs. Using closures, it’s quite easy to create custom control structures, as well as it is simple to create builders. Imagine that you have the following code:
email {
    from 'dsl-guru@mycompany.com'
    to 'john.doe@waitaminute.com'
    subject 'The pope has resigned!'
    body {
        p 'Really, the pope has resigned!'
    }
}
One way of implementing this is using the builder strategy, which
implies a method, named email which accepts a closure as an argument.
The method may delegate subsequent calls to an object that implements
the from, to, subject and body methods. Again, body is a
method which accepts a closure as an argument and that uses the builder
strategy.
Implementing such a builder is usually done the following way:
def email(Closure cl) {
    def email = new EmailSpec()
    def code = cl.rehydrate(email, this, this)
    code.resolveStrategy = Closure.DELEGATE_ONLY
    code()
}
the EmailSpec class implements the from, to, … methods. By
calling rehydrate, we’re creating a copy of the closure for which we
set the delegate, owner and thisObject values. Setting the owner
and the this object is not very important here since we will use the
DELEGATE_ONLY strategy which says that the method calls will be
resolved only against the delegate of the closure.
class EmailSpec {
    void from(String from) { println "From: $from"}
    void to(String... to) { println "To: $to"}
    void subject(String subject) { println "Subject: $subject"}
    void body(Closure body) {
        def bodySpec = new BodySpec()
        def code = body.rehydrate(bodySpec, this, this)
        code.resolveStrategy = Closure.DELEGATE_ONLY
        code()
    }
}
The EmailSpec class has itself a body method accepting a closure that is cloned and executed. This is what
we call the builder pattern in Groovy.
One of the problems with the code that we’ve shown is that the user of
the email method doesn’t have any information about the methods that
he’s allowed to call inside the closure. The only possible information
is from the method documentation. There are two issues with this: first
of all, documentation is not always written, and if it is, it’s not
always available (javadoc not downloaded, for example). Second, it
doesn’t help IDEs. What would be really interesting, here, is for IDEs
to help the developer by suggesting, once they are in the closure body,
methods that exist on the email class.
Moreover, if the user calls a method in the closure which is not defined
by the EmailSpec class, the IDE should at least issue a warning (because
it’s very likely that it will break at runtime).
One more problem with the code above is that it is not compatible with static type checking. Type checking would let the user know if a method call is authorized at compile time instead of runtime, but if you try to perform type checking on this code:
email {
    from 'dsl-guru@mycompany.com'
    to 'john.doe@waitaminute.com'
    subject 'The pope has resigned!'
    body {
        p 'Really, the pope has resigned!'
    }
}
Then the type checker will know that there’s an email method accepting
a Closure, but it will complain about every method call inside the
closure, because from, for example, is not a method which is defined
in the class. Indeed, it’s defined in the EmailSpec class and it has
absolutely no hint to help it knowing that the closure delegate will, at
runtime, be of type EmailSpec:
@groovy.transform.TypeChecked
void sendEmail() {
    email {
        from 'dsl-guru@mycompany.com'
        to 'john.doe@waitaminute.com'
        subject 'The pope has resigned!'
        body {
            p 'Really, the pope has resigned!'
        }
    }
}
will fail compilation with errors like this one:
[Static type checking] - Cannot find matching method MyScript#from(java.lang.String). Please check if the declared type is correct and if the method exists.
 @ line 31, column 21.
                       from 'dsl-guru@mycompany.com'
5.2. @DelegatesTo
For those reasons, Groovy 2.1 introduced a new annotation
named @DelegatesTo. The goal of this annotation is to solve both the
documentation issue, that will let your IDE know about the expected
methods in the closure body, and it will also solve the type checking
issue, by giving hints to the compiler about what are the potential
receivers of method calls in the closure body.
The idea is to annotate the Closure parameter of the email method:
def email(@DelegatesTo(EmailSpec) Closure cl) {
    def email = new EmailSpec()
    def code = cl.rehydrate(email, this, this)
    code.resolveStrategy = Closure.DELEGATE_ONLY
    code()
}
What we’ve done here is telling the compiler (or the IDE) that when the
method will be called with a closure, the delegate of this closure will
be set to an object of type email. But there is still a problem: the
default delegation strategy is not the one which is used in our method.
So we will give more information and tell the compiler (or the IDE) that
the delegation strategy is also changed:
def email(@DelegatesTo(strategy=Closure.DELEGATE_ONLY, value=EmailSpec) Closure cl) {
    def email = new EmailSpec()
    def code = cl.rehydrate(email, this, this)
    code.resolveStrategy = Closure.DELEGATE_ONLY
    code()
}
Now, both the IDE and the type checker (if you are using @TypeChecked)
will be aware of the delegate and the delegation strategy. This is very
nice because it will both allow the IDE to provide smart completion, but
it will also remove errors at compile time that exist only because the
behaviour of the program is normally only known at runtime!
The following code will now pass compilation:
@TypeChecked
void doEmail() {
    email {
        from 'dsl-guru@mycompany.com'
        to 'john.doe@waitaminute.com'
        subject 'The pope has resigned!'
        body {
            p 'Really, the pope has resigned!'
        }
    }
}
5.3. DelegatesTo modes
@DelegatesTo supports multiple modes that we will describe with examples
in this section.
5.3.1. Simple delegation
In this mode, the only mandatory parameter is the value which says to
which class we delegate calls. Nothing more. We’re telling the compiler
that the type of the delegate will always be of the type documented
by @DelegatesTo (note that it can be a subclass, but if it is, the
methods defined by the subclass will not be visible to the type
checker).
void body(@DelegatesTo(BodySpec) Closure cl) {
    // ...
}
5.3.2. Delegation strategy
In this mode, you must specify both the delegate class and a
delegation strategy. This must be used if the closure will not be called
with the default delegation strategy, which is Closure.OWNER_FIRST.
void body(@DelegatesTo(strategy=Closure.DELEGATE_ONLY, value=BodySpec) Closure cl) {
    // ...
}
5.3.3. Delegate to parameter
In this variant, we will tell the compiler that we are delegating to another parameter of the method. Take the following code:
def exec(Object target, Closure code) {
   def clone = code.rehydrate(target, this, this)
   clone()
}
Here, the delegate which will be used is not created inside the exec
method. In fact, we take an argument of the method and delegate to it.
Usage may look like this:
def email = new Email()
exec(email) {
   from '...'
   to '...'
   send()
}
Each of the method calls are delegated to the email parameter. This is
a widely used pattern which is also supported by @DelegatesTo using a
companion annotation:
def exec(@DelegatesTo.Target Object target, @DelegatesTo Closure code) {
   def clone = code.rehydrate(target, this, this)
   clone()
}
A closure is annotated with @DelegatesTo, but this time, without
specifying any class. Instead, we’re annotating another parameter
with @DelegatesTo.Target. The type of the delegate is then determined
at compile time. One could think that we are using the parameter type,
which in this case is Object but this is not true. Take this code:
class Greeter {
   void sayHello() { println 'Hello' }
}
def greeter = new Greeter()
exec(greeter) {
   sayHello()
}
Remember that this works out of the box without having to annotate
with @DelegatesTo. However, to make the IDE aware of the delegate
type, or the type checker aware of it, we need to add @DelegatesTo.
And in this case, it will know that the Greeter variable is of
type Greeter, so it will not report errors on the sayHello
method even if the exec method doesn’t explicitly define the target as
of type Greeter. This is a very powerful feature, because it prevents
you from writing multiple versions of the same exec method for
different receiver types!
In this mode, the @DelegatesTo annotation also supports the strategy
parameter that we’ve described upper.
5.3.4. Multiple closures
In the previous example, the exec method accepted only one closure,
but you may have methods that take multiple closures:
void fooBarBaz(Closure foo, Closure bar, Closure baz) {
    ...
}
Then nothing prevents you from annotating each closure
with @DelegatesTo:
class Foo { void foo(String msg) { println "Foo ${msg}!" } }
class Bar { void bar(int x) { println "Bar ${x}!" } }
class Baz { void baz(Date d) { println "Baz ${d}!" } }

void fooBarBaz(@DelegatesTo(Foo) Closure foo, @DelegatesTo(Bar) Closure bar, @DelegatesTo(Baz) Closure baz) {
   ...
}
But more importantly, if you have multiple closures and multiple arguments, you can use several targets:
void fooBarBaz(
    @DelegatesTo.Target('foo') foo,
    @DelegatesTo.Target('bar') bar,
    @DelegatesTo.Target('baz') baz,

    @DelegatesTo(target='foo') Closure cl1,
    @DelegatesTo(target='bar') Closure cl2,
    @DelegatesTo(target='baz') Closure cl3) {
    cl1.rehydrate(foo, this, this).call()
    cl2.rehydrate(bar, this, this).call()
    cl3.rehydrate(baz, this, this).call()
}

def a = new Foo()
def b = new Bar()
def c = new Baz()
fooBarBaz(
    a, b, c,
    { foo('Hello') },
    { bar(123) },
    { baz(new Date()) }
)| At this point, you may wonder why we don’t use the parameter names as references. The reason is that the information (the parameter name) is not always available (it’s a debug-only information), so it’s a limitation of the JVM. |
5.3.5. Delegating to a generic type
In some situations, it is interesting to instruct the IDE or the compiler that the delegate type will not be a parameter but a generic type. Imagine a configurator that runs on a list of elements:
public <T> void configure(List<T> elements, Closure configuration) {
   elements.each { e->
      def clone = configuration.rehydrate(e, this, this)
      clone.resolveStrategy = Closure.DELEGATE_FIRST
      clone.call()
   }
}
Then this method can be called with any list like this:
@groovy.transform.ToString
class Realm {
   String name
}
List<Realm> list = []
3.times { list << new Realm() }
configure(list) {
   name = 'My Realm'
}
assert list.every { it.name == 'My Realm' }
To let the type checker and the IDE know that the configure method calls the closure on each element of the list, you
need to use @DelegatesTo differently:
public <T> void configure(
    @DelegatesTo.Target List<T> elements,
    @DelegatesTo(strategy=Closure.DELEGATE_FIRST, genericTypeIndex=0) Closure configuration) {
   def clone = configuration.rehydrate(e, this, this)
   clone.resolveStrategy = Closure.DELEGATE_FIRST
   clone.call()
}
@DelegatesTo takes an optional genericTypeIndex argument that tells what is the index of the generic type that will
be used as the delegate type. This must be used in conjunction with @DelegatesTo.Target and the index starts at 0. In
the example above, that means that the delegate type is resolved against List<T>, and since the generic type at index
0 is T and inferred as a Realm, the type checker infers that the delegate type will be of type Realm.
We’re using a genericTypeIndex instead of a placeholder (T) because of JVM limitations.
|
5.3.6. Delegating to an arbitrary type
It is possible that none of the options above can represent the type you want to delegate to. For example, let’s define a mapper class which is parametrized with an object and defines a map method which returns an object of another type:
class Mapper<T,U> {                             (1)
    final T value                               (2)
    Mapper(T value) { this.value = value }
    U map(Closure<U> producer) {                (3)
        producer.delegate = value
        producer()
    }
}| 1 | The mapper class takes two generic type arguments: the source type and the target type |
| 2 | The source object is stored in a final field |
| 3 | The map method asks to convert the source object to a target object |
As you can see, the method signature from map does not give any information about what object will
be manipulated by the closure. Reading the method body, we know that it will be the value which is
of type T, but T is not found in the method signature, so we are facing a case where none of the
available options for @DelegatesTo is suitable. For example, if we try to statically compile this code:
def mapper = new Mapper<String,Integer>('Hello')
assert mapper.map { length() } == 5
Then the compiler will fail with:
Static type checking] - Cannot find matching method TestScript0#length()
In that case, you can use the type member of the @DelegatesTo annotation to reference T as a type token:
class Mapper<T,U> {
    final T value
    Mapper(T value) { this.value = value }
    U map(@DelegatesTo(type="T") Closure<U> producer) {  (1)
        producer.delegate = value
        producer()
    }
}| 1 | The @DelegatesTo annotation references a generic type which is not found in the method signature |
Note that you are not limited to generic type tokens. The type member can be used to represent complex types, such
as List<T> or Map<T,List<U>>. The reason why you should use that in last resort is that the type is only checked
when the type checker finds usage of @DelegatesTo, not when the annotated method itself is compiled. This means that
type safety is only ensured at the call site. Additionally, compilation will be slower (though probably unnoticeable for
most cases).
6. Compilation customizers
6.1. Introduction
Whether you are using groovyc to compile classes or a GroovyShell,
for example, to execute scripts, under the hood, a compiler configuration is used. This configuration holds information
like the source encoding or the classpath but it can also be used to perform more operations like adding imports by
default, applying AST transformations transparently or disabling global AST transformations.
The goal of compilation customizers is to make those common tasks easy to implement. For that, the CompilerConfiguration
class is the entry point. The general schema will always be based on the following code:
import org.codehaus.groovy.control.CompilerConfiguration
// create a configuration
def config = new CompilerConfiguration()
// tweak the configuration
config.addCompilationCustomizers(...)
// run your script
def shell = new GroovyShell(config)
shell.evaluate(script)
Compilation customizers must extend the org.codehaus.groovy.control.customizers.CompilationCustomizer class. A customizer works:
-
on a specific compilation phase
-
on every class node being compiled
You can implement your own compilation customizer but Groovy includes some of the most common operations.
6.2. Import customizer
Using this compilation customizer, your code will have imports added transparently. This is in particular useful for scripts implementing a DSL where you want to avoid users from having to write imports. The import customizer will let you add all the variants of imports the Groovy language allows, that is:
-
class imports, optionally aliased
-
star imports
-
static imports, optionally aliased
-
static star imports
import org.codehaus.groovy.control.customizers.ImportCustomizer

def icz = new ImportCustomizer()
// "normal" import
icz.addImports('java.util.concurrent.atomic.AtomicInteger', 'java.util.concurrent.ConcurrentHashMap')
// "aliases" import
icz.addImport('CHM', 'java.util.concurrent.ConcurrentHashMap')
// "static" import
icz.addStaticImport('java.lang.Math', 'PI') // import static java.lang.Math.PI
// "aliased static" import
icz.addStaticImport('pi', 'java.lang.Math', 'PI') // import static java.lang.Math.PI as pi
// "star" import
icz.addStarImports 'java.util.concurrent' // import java.util.concurrent.*
// "static star" import
icz.addStaticStars 'java.lang.Math' // import static java.lang.Math.*
A detailed description of all shortcuts can be found in org.codehaus.groovy.control.customizers.ImportCustomizer
6.3. AST transformation customizer
The AST transformation customizer is meant to apply AST transformations transparently. Unlike global AST transformations that apply on every class being compiled as long as the transform is found on classpath (which has drawbacks like increasing the compilation time or side effects due to transformations applied where they should not), the customizer will allow you to selectively apply a transform only for specific scripts or classes.
As an example, let’s say you want to be able to use @Log in a script.
The problem is that @Log is normally applied on a class node and a
script, by definition, doesn’t require one. But implementation wise,
scripts are classes, it’s just that you cannot annotate this implicit
class node with @Log. Using the AST customizer, you have a workaround
to do it:
import org.codehaus.groovy.control.customizers.ASTTransformationCustomizer
import groovy.util.logging.Log

def acz = new ASTTransformationCustomizer(Log)
config.addCompilationCustomizers(acz)
That’s all! Internally, the @Log AST transformation is applied to
every class node in the compilation unit. This means that it will be
applied to the script, but also to classes defined within the script.
If the AST transformation that you are using accepts parameters, you can use parameters in the constructor too:
def acz = new ASTTransformationCustomizer(Log, value: 'LOGGER')
// use name 'LOGGER' instead of the default 'log'
config.addCompilationCustomizers(acz)
As the AST transformation customizers works with objects instead of AST
nodes, not all values can be converted to AST transformation parameters.
For example, primitive types are converted to ConstantExpression (that
is LOGGER is converted to new ConstantExpression('LOGGER'), but if
your AST transformation takes a closure as an argument, then you have to
give it a ClosureExpression, like in the following example:
def configuration = new CompilerConfiguration()
def expression = new AstBuilder().buildFromCode(CompilePhase.CONVERSION) { -> true }.expression[0]
def customizer = new ASTTransformationCustomizer(ConditionalInterrupt, value: expression, thrown: SecurityException)
configuration.addCompilationCustomizers(customizer)
def shell = new GroovyShell(configuration)
shouldFail(SecurityException) {
    shell.evaluate("""
        // equivalent to adding @ConditionalInterrupt(value={true}, thrown: SecurityException)
        class MyClass {
            void doIt() { }
        }
        new MyClass().doIt()
    """)
}
For a complete list of options, please refer to org.codehaus.groovy.control.customizers.ASTTransformationCustomizer
6.4. Secure AST customizer
This customizer will allow the developer of a DSL to restrict the grammar of the language, for example, to prevent users from using particular constructs. It is only ``secure'' in that one aspect, i.e. limiting the allowable constructs within a DSL. It does not replace a security manager which might additionally be needed as an orthogonal aspect of overall security. The only reason for it to exist is to limit the expressiveness of the language. This customizer only works at the AST (abstract syntax tree) level, not at runtime! It can be strange at first glance, but it makes much more sense if you think of Groovy as a platform to build DSLs. You may not want a user to have a complete language at hand. In the example below, we will demonstrate it using an example of language that only allows arithmetic operations, but this customizer allows you to:
-
allow/disallow creation of closures
-
allow/disallow imports
-
allow/disallow package definition
-
allow/disallow definition of methods
-
restrict the receivers of method calls
-
restrict the kind of AST expressions a user can use
-
restrict the tokens (grammar-wise) a user can use
-
restrict the types of the constants that can be used in code
For all those features, the secure AST customizer works using either an allowed list (list of elements that are permitted) or a disallowed list (list of elements that are not permitted). For each type of feature (imports, tokens, …) you have the choice to use either an allowed or disallowed list, but you can mix dis/allowed lists for distinct features. Typically, you will choose allowed lists (which permits only the constructs listed and disallows all others).
import org.codehaus.groovy.control.customizers.SecureASTCustomizer
import static org.codehaus.groovy.syntax.Types.* (1)

def scz = new SecureASTCustomizer()
scz.with {
    closuresAllowed = false // user will not be able to write closures
    methodDefinitionAllowed = false // user will not be able to define methods
    allowedImports = [] // empty allowed list means imports are disallowed
    allowedStaticImports = [] // same for static imports
    allowedStaticStarImports = ['java.lang.Math'] // only java.lang.Math is allowed
    // the list of tokens the user can find
    // constants are defined in org.codehaus.groovy.syntax.Types
    allowedTokens = [ (1)
            PLUS,
            MINUS,
            MULTIPLY,
            DIVIDE,
            REMAINDER,
            POWER,
            PLUS_PLUS,
            MINUS_MINUS,
            COMPARE_EQUAL,
            COMPARE_NOT_EQUAL,
            COMPARE_LESS_THAN,
            COMPARE_LESS_THAN_EQUAL,
            COMPARE_GREATER_THAN,
            COMPARE_GREATER_THAN_EQUAL,
    ].asImmutable()
    // limit the types of constants that a user can define to number types only
    allowedConstantTypesClasses = [ (2)
            Integer,
            Float,
            Long,
            Double,
            BigDecimal,
            Integer.TYPE,
            Long.TYPE,
            Float.TYPE,
            Double.TYPE
    ].asImmutable()
    // method calls are only allowed if the receiver is of one of those types
    // be careful, it's not a runtime type!
    allowedReceiversClasses = [ (2)
            Math,
            Integer,
            Float,
            Double,
            Long,
            BigDecimal
    ].asImmutable()
}| 1 | use for token types from org.codehaus.groovy.syntax.Types |
| 2 | you can use class literals here |
If what the secure AST customizer provides out of the box isn’t enough
for your needs, before creating your own compilation customizer, you
might be interested in the expression and statement checkers that the
AST customizer supports. Basically, it allows you to add custom checks
on the AST tree, on expressions (expression checkers) or statements
(statement checkers). For this, you must
implement org.codehaus.groovy.control.customizers.SecureASTCustomizer.StatementChecker
or org.codehaus.groovy.control.customizers.SecureASTCustomizer.ExpressionChecker.
Those interfaces define a single method called isAuthorized, returning
a boolean, and taking a Statement (or Expression) as a parameter. It
allows you to perform complex logic over expressions or statements to
tell if a user is allowed to do it or not.
For example, there’s no predefined configuration flag in the customizer which will let you prevent people from using an attribute expression. Using a custom checker, it is trivial:
def scz = new SecureASTCustomizer()
def checker = { expr ->
    !(expr instanceof AttributeExpression)
} as SecureASTCustomizer.ExpressionChecker
scz.addExpressionCheckers(checker)
Then we can make sure that this works by evaluating a simple script:
new GroovyShell(config).evaluate '''
    class A {
        int val
    }

    def a = new A(val: 123)
    a.@val (1)
'''| 1 | will fail compilation |
Statements can be checked using org.codehaus.groovy.control.customizers.SecureASTCustomizer.StatementChecker Expressions can be checked using org.codehaus.groovy.control.customizers.SecureASTCustomizer.ExpressionChecker
6.5. Source aware customizer
This customizer may be used as a filter on other customizers. The
filter, in that case, is the org.codehaus.groovy.control.SourceUnit.
For this, the source aware customizer takes another customizer as a
delegate, and it will apply customization of that delegate only and only
if predicates on the source unit match.
SourceUnit gives you access to multiple things but in particular the
file being compiled (if compiling from a file, of course). It gives
you the potential to perform operation based on the file name, for
example. Here is how you would create a source aware customizer:
import org.codehaus.groovy.control.customizers.SourceAwareCustomizer
import org.codehaus.groovy.control.customizers.ImportCustomizer

def delegate = new ImportCustomizer()
def sac = new SourceAwareCustomizer(delegate)
Then you can use predicates on the source aware customizer:
// the customizer will only be applied to classes contained in a file name ending with 'Bean'
sac.baseNameValidator = { baseName ->
    baseName.endsWith 'Bean'
}

// the customizer will only be applied to files which extension is '.spec'
sac.extensionValidator = { ext -> ext == 'spec' }

// source unit validation
// allow compilation only if the file contains at most 1 class
sac.sourceUnitValidator = { SourceUnit sourceUnit -> sourceUnit.AST.classes.size() == 1 }

// class validation
// the customizer will only be applied to classes ending with 'Bean'
sac.classValidator = { ClassNode cn -> cn.endsWith('Bean') }
6.6. Customizer builder
If you are using compilation customizers in Groovy code (like the
examples above) then you can use an alternative syntax to customize compilation.
A builder (org.codehaus.groovy.control.customizers.builder.CompilerCustomizationBuilder)
simplifies the creation of customizers using a hierarchical DSL.
import org.codehaus.groovy.control.CompilerConfiguration
import static org.codehaus.groovy.control.customizers.builder.CompilerCustomizationBuilder.withConfig (1)

def conf = new CompilerConfiguration()
withConfig(conf) {
    // ... (2)
}| 1 | static import of the builder method |
| 2 | configuration goes here |
The code sample above shows how to use the builder. A static method, withConfig, takes a closure corresponding to the builder code, and automatically registers compilation customizers to the configuration. Every compilation customizer available in the distribution can be configured this way:
6.6.1. Import customizer
withConfig(configuration) {
   imports { // imports customizer
      normal 'my.package.MyClass' // a normal import
      alias 'AI', 'java.util.concurrent.atomic.AtomicInteger' // an aliased import
      star 'java.util.concurrent' // star imports
      staticMember 'java.lang.Math', 'PI' // static import
      staticMember 'pi', 'java.lang.Math', 'PI' // aliased static import
   }
}
6.6.2. AST transformation customizer
withConfig(conf) {
   ast(Log) (1)
}

withConfig(conf) {
   ast(Log, value: 'LOGGER') (2)
}| 1 | apply @Log transparently |
| 2 | apply @Log with a different name for the logger |
6.6.3. Secure AST customizer
withConfig(conf) {
   secureAst {
       closuresAllowed = false
       methodDefinitionAllowed = false
   }
}
6.6.4. Source aware customizer
withConfig(configuration){
    source(extension: 'sgroovy') {
        ast(CompileStatic) (1)
    }
}

withConfig(configuration){
    source(extensions: ['sgroovy','sg']) {
        ast(CompileStatic) (2)
    }
}

withConfig(configuration) {
    source(extensionValidator: { it.name in ['sgroovy','sg']}) {
        ast(CompileStatic) (2)
    }
}

withConfig(configuration) {
    source(basename: 'foo') {
        ast(CompileStatic) (3)
    }
}

withConfig(configuration) {
    source(basenames: ['foo', 'bar']) {
        ast(CompileStatic) (4)
    }
}

withConfig(configuration) {
    source(basenameValidator: { it in ['foo', 'bar'] }) {
        ast(CompileStatic) (4)
    }
}

withConfig(configuration) {
    source(unitValidator: { unit -> !unit.AST.classes.any { it.name == 'Baz' } }) {
        ast(CompileStatic) (5)
    }
}| 1 | apply CompileStatic AST annotation on .sgroovy files |
| 2 | apply CompileStatic AST annotation on .sgroovy or .sg files |
| 3 | apply CompileStatic AST annotation on files whose name is 'foo' |
| 4 | apply CompileStatic AST annotation on files whose name is 'foo' or 'bar' |
| 5 | apply CompileStatic AST annotation on files that do not contain a class named 'Baz' |
6.6.5. Inlining a customizer
Inlined customizer allows you to write a compilation customizer directly, without having to create a class for it.
withConfig(configuration) {
    inline(phase:'CONVERSION') { source, context, classNode ->  (1)
        println "visiting $classNode"                           (2)
    }
}| 1 | define an inlined customizer which will execute at the CONVERSION phase |
| 2 | prints the name of the class node being compiled |
6.6.6. Multiple customizers
Of course, the builder allows you to define multiple customizers at once:
withConfig(configuration) {
   ast(ToString)
   ast(EqualsAndHashCode)
}
6.7. The configscript commandline parameter
So far, we have described how you can customize compilation using
a CompilationConfiguration class, but this is only possible if you
embed Groovy and that you create your own instances
of CompilerConfiguration (then use it to create a
GroovyShell, GroovyScriptEngine, …).
If you want it to be applied on the classes you compile with the normal
Groovy compiler (that is to say with groovyc, ant or gradle,
for example), it is possible to use a commandline parameter named configscript
that takes a Groovy configuration script as argument.
This script gives you access to the CompilerConfiguration instance before
the files are compiled (exposed into the configuration script as a variable named configuration),
so that you can tweak it.
It also transparently integrates the compiler configuration builder above. As an example, let’s see how you would activate static compilation by default on all classes.
6.7.1. Configscript example: Static compilation by default
Normally, classes in Groovy are compiled with a dynamic runtime. You can activate static compilation
by placing an annotation named @CompileStatic on any class. Some people would like to have this
mode activated by default, that is to say not having to annotate (potentially many) classes.
Using configscript, makes this possible.
First of all, you need to create a file named config.groovy into say src/conf with
the following contents:
withConfig(configuration) { (1)
   ast(groovy.transform.CompileStatic)
}| 1 | configuration references a CompilerConfiguration instance |
That is actually all you need. You don’t have to import the builder, it’s automatically exposed in the script. Then, compile your files using the following command line:
groovyc -configscript src/conf/config.groovy src/main/groovy/MyClass.groovy
We strongly recommend you to separate configuration files from classes,
hence why we suggest using the src/main and src/conf directories above.
6.7.2. Configscript example: Setting system properties
In a configuration script you can also set system properties, e.g.:
System.setProperty('spock.iKnowWhatImDoing.disableGroovyVersionCheck', 'true')If you have numerous system properties to set, then using a configuration file will reduce the need to set a bunch of system properties with a long command line or appropriately defined environment variable. You can also share all the settings by simply sharing the config file.
6.8. AST transformations
If:
-
runtime metaprogramming doesn’t allow you to do what you want
-
you need to improve the performance of the execution of your DSLs
-
you want to leverage the same syntax as Groovy but with different semantics
-
you want to improve support for type checking in your DSLs
Then AST transformations are the way to go. Unlike the techniques used so far, AST transformations are meant to change or generate code before it is compiled to bytecode. AST transformations are capable of adding new methods at compile time for example, or totally changing the body of a method based on your needs. They are a very powerful tool but also come at the price of not being easy to write. For more information about AST transformations, please take a look at the compile-time metaprogramming section of this manual.
7. Custom type checking extensions
It may be interesting, in some circumstances, to provide feedback about wrong code to the user as soon as possible, that is to say when the DSL script is compiled, rather than having to wait for the execution of the script. However, this is not often possible with dynamic code. Groovy actually provides a practical answer to this known as type checking extensions.
8. Builders
Many tasks require building things and the builder pattern is one technique used by developers to make building things easier, especially building of structures which are hierarchical in nature. This pattern is so ubiquitous that Groovy has special built-in support. Firstly, there are many built-in builders. Secondly, there are classes which make it easier to write your own builders.
8.1. Existing builders
Groovy comes with many built-in builders. Let’s look at some of them.
8.1.3. SaxBuilder
A builder for generating Simple API for XML (SAX) events.
If you have the following SAX handler:
class LogHandler extends org.xml.sax.helpers.DefaultHandler {

    String log = ''

    void startElement(String uri, String localName, String qName, org.xml.sax.Attributes attributes) {
        log += "Start Element: $localName, "
    }

    void endElement(String uri, String localName, String qName) {
        log += "End Element: $localName, "
    }
}
You can use SaxBuilder to generate SAX events for the handler like this:
def handler = new LogHandler()
def builder = new groovy.xml.SAXBuilder(handler)

builder.root() {
    helloWorld()
}
And then check that everything worked as expected:
assert handler.log == 'Start Element: root, Start Element: helloWorld, End Element: helloWorld, End Element: root, '8.1.4. StaxBuilder
A Groovy builder that works with Streaming API for XML (StAX) processors.
Here is a simple example using the StAX implementation of Java to generate XML:
def factory = javax.xml.stream.XMLOutputFactory.newInstance()
def writer = new StringWriter()
def builder = new groovy.xml.StaxBuilder(factory.createXMLStreamWriter(writer))

builder.root(attribute:1) {
    elem1('hello')
    elem2('world')
}

assert writer.toString() == '<?xml version="1.0" ?><root attribute="1"><elem1>hello</elem1><elem2>world</elem2></root>'
An external library such as Jettison can be used as follows:
@Grab('org.codehaus.jettison:jettison:1.3.3')
@GrabExclude('stax:stax-api') // part of Java 6 and later
import org.codehaus.jettison.mapped.*

def writer = new StringWriter()
def mappedWriter = new MappedXMLStreamWriter(new MappedNamespaceConvention(), writer)
def builder = new groovy.xml.StaxBuilder(mappedWriter)

builder.root(attribute:1) {
     elem1('hello')
     elem2('world')
}

assert writer.toString() == '{"root":{"@attribute":"1","elem1":"hello","elem2":"world"}}'
8.1.5. DOMBuilder
A builder for parsing HTML, XHTML and XML into a W3C DOM tree.
For example this XML String:
String recordsXML = '''
    <records>
      <car name='HSV Maloo' make='Holden' year='2006'>
        <country>Australia</country>
        <record type='speed'>Production Pickup Truck with speed of 271kph</record>
      </car>
      <car name='P50' make='Peel' year='1962'>
        <country>Isle of Man</country>
        <record type='size'>Smallest Street-Legal Car at 99cm wide and 59 kg in weight</record>
      </car>
      <car name='Royale' make='Bugatti' year='1931'>
        <country>France</country>
        <record type='price'>Most Valuable Car at $15 million</record>
      </car>
    </records>'''
Can be parsed into a DOM tree with a DOMBuilder like this:
def reader = new StringReader(recordsXML)
def doc = groovy.xml.DOMBuilder.parse(reader)
And then processed further e.g. by using DOMCategory:
def records = doc.documentElement
use(groovy.xml.dom.DOMCategory) {
    assert records.car.size() == 3
}
8.1.6. NodeBuilder
NodeBuilder is used for creating nested trees of groovy.util.Node objects for handling arbitrary data.
To create a simple user list you use a NodeBuilder like this:
def nodeBuilder = new NodeBuilder()
def userlist = nodeBuilder.userlist {
    user(id: '1', firstname: 'John', lastname: 'Smith') {
        address(type: 'home', street: '1 Main St.', city: 'Springfield', state: 'MA', zip: '12345')
        address(type: 'work', street: '2 South St.', city: 'Boston', state: 'MA', zip: '98765')
    }
    user(id: '2', firstname: 'Alice', lastname: 'Doe')
}
Now you can process the data further, e.g. by using GPath expressions:
assert userlist.user.@firstname.join(', ') == 'John, Alice'
assert userlist.user.find { it.@lastname == 'Smith' }.address.size() == 2
8.1.7. JsonBuilder
Groovy’s JsonBuilder makes it easy to create Json. For example to create this Json string:
String carRecords = '''
    {
        "records": {
        "car": {
            "name": "HSV Maloo",
            "make": "Holden",
            "year": 2006,
            "country": "Australia",
            "record": {
              "type": "speed",
              "description": "production pickup truck with speed of 271kph"
            }
          }
      }
    }
'''
you can use a JsonBuilder like this:
JsonBuilder builder = new JsonBuilder()
builder.records {
  car {
        name 'HSV Maloo'
        make 'Holden'
        year 2006
        country 'Australia'
        record {
            type 'speed'
            description 'production pickup truck with speed of 271kph'
        }
  }
}
String json = JsonOutput.prettyPrint(builder.toString())
We use JsonUnit to check that the builder produced the expected result:
JsonAssert.assertJsonEquals(json, carRecords)If you need to customize the generated output you can pass a JsonGenerator instance when creating a JsonBuilder:
import groovy.json.*

def generator = new JsonGenerator.Options()
        .excludeNulls()
        .excludeFieldsByName('make', 'country', 'record')
        .excludeFieldsByType(Number)
        .addConverter(URL) { url -> "http://groovy-lang.org" }
        .build()

JsonBuilder builder = new JsonBuilder(generator)
builder.records {
  car {
        name 'HSV Maloo'
        make 'Holden'
        year 2006
        country 'Australia'
        homepage new URL('http://example.org')
        record {
            type 'speed'
            description 'production pickup truck with speed of 271kph'
        }
  }
}

assert builder.toString() == '{"records":{"car":{"name":"HSV Maloo","homepage":"http://groovy-lang.org"}}}'
8.1.8. StreamingJsonBuilder
Unlike JsonBuilder which creates a data structure in memory, which is handy in those situations where you want to alter the structure programmatically before output,
StreamingJsonBuilder directly streams to a writer without any intermediate memory data structure.
If you do not need to modify the structure and want a more memory-efficient approach, use StreamingJsonBuilder.
The usage of StreamingJsonBuilder is similar to JsonBuilder. In order to create this Json string:
String carRecords = """
    {
      "records": {
        "car": {
          "name": "HSV Maloo",
          "make": "Holden",
          "year": 2006,
          "country": "Australia",
          "record": {
            "type": "speed",
            "description": "production pickup truck with speed of 271kph"
          }
        }
      }
    }
"""
you use a StreamingJsonBuilder like this:
StringWriter writer = new StringWriter()
StreamingJsonBuilder builder = new StreamingJsonBuilder(writer)
builder.records {
    car {
        name 'HSV Maloo'
        make 'Holden'
        year 2006
        country 'Australia'
        record {
            type 'speed'
            description 'production pickup truck with speed of 271kph'
        }
    }
}
String json = JsonOutput.prettyPrint(writer.toString())
We use JsonUnit to check the expected result:
JsonAssert.assertJsonEquals(json, carRecords)If you need to customize the generated output you can pass a JsonGenerator instance when creating a StreamingJsonBuilder:
def generator = new JsonGenerator.Options()
        .excludeNulls()
        .excludeFieldsByName('make', 'country', 'record')
        .excludeFieldsByType(Number)
        .addConverter(URL) { url -> "http://groovy-lang.org" }
        .build()

StringWriter writer = new StringWriter()
StreamingJsonBuilder builder = new StreamingJsonBuilder(writer, generator)

builder.records {
    car {
        name 'HSV Maloo'
        make 'Holden'
        year 2006
        country 'Australia'
        homepage new URL('http://example.org')
        record {
            type 'speed'
            description 'production pickup truck with speed of 271kph'
        }
    }
}

assert writer.toString() == '{"records":{"car":{"name":"HSV Maloo","homepage":"http://groovy-lang.org"}}}'
8.1.9. SwingBuilder
SwingBuilder allows you to create full-fledged Swing GUIs in a declarative and concise fashion. It accomplishes this by employing a common idiom in Groovy, builders.
Builders handle the busywork of creating complex objects for you, such as instantiating children, calling Swing methods, and attaching these children to their parents.
As a consequence, your code is much more readable and maintainable, while still allowing you to access to the full range of Swing components.
Here’s a simple example of using SwingBuilder:
import groovy.swing.SwingBuilder
import java.awt.BorderLayout as BL

count = 0
new SwingBuilder().edt {
  frame(title: 'Frame', size: [250, 75], show: true) {
    borderLayout()
    textlabel = label(text: 'Click the button!', constraints: BL.NORTH)
    button(text:'Click Me',
         actionPerformed: {count++; textlabel.text = "Clicked ${count} time(s)."; println "clicked"}, constraints:BL.SOUTH)
  }
}
Here is what it will look like:

This hierarchy of components would normally be created through a series of repetitive instantiations, setters, and finally attaching this child to its respective parent.
Using SwingBuilder, however, allows you to define this hierarchy in its native form, which makes the interface design understandable simply by reading the code.
The flexibility shown here is made possible by leveraging the many programming features built-in to Groovy, such as closures, implicit constructor calling, import aliasing, and string interpolation.
Of course, these do not have to be fully understood in order to use SwingBuilder; as you can see from the code above, their uses are intuitive.
Here is a slightly more involved example, with an example of SwingBuilder code re-use via a closure.
import groovy.swing.SwingBuilder
import javax.swing.*
import java.awt.*

def swing = new SwingBuilder()

def sharedPanel = {
     swing.panel() {
        label("Shared Panel")
    }
}

count = 0
swing.edt {
    frame(title: 'Frame', defaultCloseOperation: JFrame.EXIT_ON_CLOSE, pack: true, show: true) {
        vbox {
            textlabel = label('Click the button!')
            button(
                text: 'Click Me',
                actionPerformed: {
                    count++
                    textlabel.text = "Clicked ${count} time(s)."
                    println "Clicked!"
                }
            )
            widget(sharedPanel())
            widget(sharedPanel())
        }
    }
}
Here’s another variation that relies on observable beans and binding:
import groovy.swing.SwingBuilder
import groovy.beans.Bindable

class MyModel {
   @Bindable int count = 0
}

def model = new MyModel()
new SwingBuilder().edt {
  frame(title: 'Java Frame', size: [100, 100], locationRelativeTo: null, show: true) {
    gridLayout(cols: 1, rows: 2)
    label(text: bind(source: model, sourceProperty: 'count', converter: { v ->  v? "Clicked $v times": ''}))
    button('Click me!', actionPerformed: { model.count++ })
  }
}
@Bindable is one of the core AST Transformations. It generates all the required boilerplate code to turn a simple bean into an observable one. The bind() node creates appropriate PropertyChangeListeners that will update the interested parties whenever a PropertyChangeEvent is fired.
8.1.10. AntBuilder
Here we describe AntBuilder which lets you write Ant build scripts
in Groovy rather than XML. You may also be interested in using Groovy
from Ant using the Groovy Ant task.
|
Despite being primarily a build tool, Apache Ant is
a very practical tool for manipulating files including zip files, copy, resource processing, and more.
But if ever you’ve been working with a build.xml file or some Jelly script
and found yourself a little restricted by all those pointy brackets, or
found it a bit weird using XML as a scripting language and wanted
something a little cleaner and more straight forward, then maybe Ant
scripting with Groovy might be what you’re after.
Groovy has a helper class called AntBuilder which makes the scripting
of Ant tasks really easy; allowing a real scripting language to be used
for programming constructs (variables, methods, loops, logical
branching, classes etc). It still looks like a neat concise version of
Ant’s XML without all those pointy brackets; though you can mix and
match this markup inside your script. Ant itself is a collection of jar
files. By adding them to your classpath, you can easily use them within
Groovy as is. We believe using AntBuilder leads to more concise and
readily understood syntax.
AntBuilder exposes Ant tasks directly using the convenient builder notation that
we are used to in Groovy. Here is the most basic example, which is printing a message
on the standard output:
def ant = new groovy.ant.AntBuilder()          (1)
ant.echo('hello from Ant!') (2)| 1 | creates an instance of AntBuilder |
| 2 | executes the echo task with the message in parameter |
Imagine that you need to create a ZIP file. It can be as simple as:
def ant = new AntBuilder()
ant.zip(destfile: 'sources.zip', basedir: 'src')
In the next example, we demonstrate the use of AntBuilder to copy a list of files
using a classical Ant pattern directly in Groovy:
// let's just call one task
ant.echo("hello")

// here is an example of a block of Ant inside GroovyMarkup
ant.sequential {
    echo("inside sequential")
    def myDir = "build/AntTest/"
    mkdir(dir: myDir)
    copy(todir: myDir) {
        fileset(dir: "src/test") {
            include(name: "**/*.groovy")
        }
    }
    echo("done")
}

// now let's do some normal Groovy again
def file = new File(ant.project.baseDir,"build/AntTest/some/pkg/MyTest.groovy")
assert file.exists()
Another example would be iterating over a list of files matching a specific pattern:
// let's create a scanner of filesets
def scanner = ant.fileScanner {
    fileset(dir:"src/test") {
        include(name:"**/My*.groovy")
    }
}

// now let's iterate over
def found = false
for (f in scanner) {
    println("Found file $f")
    found = true
    assert f instanceof File
    assert f.name.endsWith(".groovy")
}
assert found
Or executing a JUnit test:
ant.junit {
    classpath { pathelement(path: '.') }
    test(name:'some.pkg.MyTest')
}
We can even go further by compiling and executing a Java file directly from Groovy:
ant.echo(file:'Temp.java', '''
    class Temp {
        public static void main(String[] args) {
            System.out.println("Hello");
        }
    }
''')
ant.javac(srcdir:'.', includes:'Temp.java', fork:'true')
ant.java(classpath:'.', classname:'Temp', fork:'true')
ant.echo('Done')
It is worth mentioning that AntBuilder is included in Gradle, so you can use it in Gradle
just like you would in Groovy. Additional documentation can be found in the
Gradle manual.
8.1.11. CliBuilder
CliBuilder provides a compact way to specify the available options for a commandline application and then
automatically parse the application’s commandline parameters according to that specification. By convention,
a distinction is made between option commandline parameters and any remaining parameters which are passed
to an application as its arguments. Typically, several types of options might be supported such as -V or
--tabsize=4. CliBuilder removes the burden of developing lots of code for commandline processing.
Instead, it supports a somewhat declarative approach to declaring your options and then provides a single call
to parse the commandline parameters with a simple mechanism to interrogate the options (you can think of this
as a simple model for your options).
Even though the details of each commandline you create could be quite different, the same main steps are
followed each time. First, a CliBuilder instance is created. Then, allowed commandline options are defined.
This can be done using a dynamic api style or an annotation style.
The commandline parameters are then parsed according to the options specification resulting in a
collection of options which are then interrogated.
Here is a simple example Greeter.groovy script illustrating usage:
// import of CliBuilder not shown                          (1)
// specify parameters
def cli = new CliBuilder(usage: 'groovy Greeter [option]') (2)
cli.a(longOpt: 'audience', args: 1, 'greeting audience')   (3)
cli.h(longOpt: 'help', 'display usage')                    (4)

// parse and process parameters
def options = cli.parse(args)                              (5)
if (options.h) cli.usage()                                 (6)
else println "Hello ${options.a ? options.a : 'World'}" (7)| 1 | Earlier versions of Groovy had a CliBuilder in the groovy.util package and no import was necessary.
In Groovy 2.5, this approach became deprecated: applications should instead choose the groovy.cli.picocli or groovy.cli.commons version.
The groovy.util version in Groovy 2.5 points to the commons-cli version for backwards compatibility but has been removed in Groovy 3.0. |
| 2 | define a new CliBuilder instance specifying an optional usage string |
| 3 | specify a -a option taking a single argument with an optional long variant --audience |
| 4 | specify a -h option taking no arguments with an optional long variant --help |
| 5 | parse the commandline parameters supplied to the script |
| 6 | if the h option is found display a usage message |
| 7 | display a standard greeting or, if the a option is found, a customized greeting |
Running this script with no commandline parameters, i.e.:
> groovy Greeterresults in the following output:
Hello World
Running this script with -h as the single commandline parameter, i.e.:
> groovy Greeter -hresults in the following output:
usage: groovy Greeter [option]
 -a,--audience <arg>   greeting audience
 -h,--help             display usage
Running this script with --audience Groovologist as the commandline parameters, i.e.:
> groovy Greeter --audience Groovologistresults in the following output:
Hello Groovologist
When creating the CliBuilder instance in the above example, we set the optional usage property
within the constructor call. This follows Groovy’s normal ability to set additional properties
of the instance during construction. There are numerous other properties which can be set
such as header and footer. For the complete set of available properties, see the
available properties for the groovy.util.CliBuilder class.
When defining an allowed commandline option, both a short name (e.g. "h" for the help option shown previously)
and a short description (e.g. "display usage" for the help option) must be supplied.
In our example above, we also set some
additional properties such as longOpt and args. The following additional
properties are supported when specifying an allowed commandline option:
| Name | Description | Type |
|---|---|---|
argName |
the name of the argument for this option used in output |
|
longOpt |
the long representation or long name of the option |
|
args |
the number of argument values |
|
optionalArg |
whether the argument value is optional |
|
required |
whether the option is mandatory |
|
type |
the type of this option |
|
valueSeparator |
the character that is the value separator |
|
defaultValue |
a default value |
|
convert |
converts the incoming String to the required type |
|
(1) More details later
(2) Single character Strings are coerced to chars in special cases in Groovy
If you have an option with only a longOpt variant, you can use the special shortname of '_'
to specify the option, e.g. : cli._(longOpt: 'verbose', 'enable verbose logging').
Some of the remaining named parameters should be fairly self-explanatory while others deserve
a bit more explanation. But before further explanations, let’s look at ways of using
CliBuilder with annotations.
Using Annotations and an interface
Rather than making a series of method calls (albeit in a very declarative mini-DSL form) to specify the allowable options, you can provide an interface specification of the allowable options where annotations are used to indicate and provide details for those options and for how unprocessed parameters are handled. Two annotations are used: groovy.cli.Option and groovy.cli.Unparsed.
Here is how such a specification can be defined:
interface GreeterI {
    @Option(shortName='h', description='display usage') Boolean help()        (1)
    @Option(shortName='a', description='greeting audience') String audience() (2)
    @Unparsed(description = "positional parameters") List remaining()         (3)
}| 1 | Specify a Boolean option set using -h or --help |
| 2 | Specify a String option set using -a or --audience |
| 3 | Specify where any remaining parameters will be stored |
Note how the long name is automatically determined from the interface method name.
You can use the longName annotation attribute to override that behavior and specify
a custom long name if you wish or use a longName of '_' to indicate that no long name
is to be provided. You will need to specify a shortName in such a case.
Here is how you could use the interface specification:
// import CliBuilder not shown
def cli = new CliBuilder(usage: 'groovy Greeter')  (1)
def argz = '--audience Groovologist'.split()
def options = cli.parseFromSpec(GreeterI, argz)             (2)
assert options.audience() == 'Groovologist'                 (3)

argz = '-h Some Other Args'.split()
options = cli.parseFromSpec(GreeterI, argz)                 (4)
assert options.help()
assert options.remaining() == ['Some', 'Other', 'Args'] (5)| 1 | Create a CliBuilder instance as before with optional properties |
| 2 | Parse parameters using the interface specification |
| 3 | Interrogate options using the methods from the interface |
| 4 | Parse a different set of parameters |
| 5 | Interrogate the remaining parameters |
When parseFromSpec is called, CliBuilder automatically creates an instance implementing the interface
and populates it. You simply call the interface methods to interrogate the option values.
Using Annotations and an instance
Alternatively, perhaps you already have a domain class containing the option information.
You can simply annotate properties or setters from that class to enable CliBuilder to appropriately
populate your domain object. Each annotation both describes that option’s properties through the annotation
attributes and indicates the setter the CliBuilder will use to populate that option in your domain object.
Here is how such a specification can be defined:
class GreeterC {
    @Option(shortName='h', description='display usage')
    Boolean help                        (1)

    private String audience
    @Option(shortName='a', description='greeting audience')
    void setAudience(String audience) { (2)
        this.audience = audience
    }
    String getAudience() { audience }

    @Unparsed(description = "positional parameters")
    List remaining                      (3)
}| 1 | Indicate that a Boolean property is an option |
| 2 | Indicate that a String property (with explicit setter) is an option |
| 3 | Specify where any remaining args will be stored |
And here is how you could use the specification:
// import CliBuilder not shown
def cli = new CliBuilder(usage: 'groovy Greeter [option]') (1)
def options = new GreeterC()                               (2)
def argz = '--audience Groovologist foo'.split()
cli.parseFromInstance(options, argz)                       (3)
assert options.audience == 'Groovologist'                  (4)
assert options.remaining == ['foo'] (5)| 1 | Create a CliBuilder instance as before with optional parameters |
| 2 | Create an instance for CliBuilder to populate |
| 3 | Parse arguments populating the supplied instance |
| 4 | Interrogate the String option property |
| 5 | Interrogate the remaining arguments property |
When parseFromInstance is called, CliBuilder automatically populates your instance.
You simply interrogate the instance properties (or whatever accessor methods you have provided
in your domain object) to access the option values.
Using Annotations and a script
Finally, there are two additional convenience annotation aliases specifically for scripts. They simply combine the previously mentioned annotations and groovy.transform.Field. The groovydoc for those annotations reveals the details: groovy.cli.OptionField and groovy.cli.UnparsedField.
Here is an example using those annotations in a self-contained script that would be called with the same arguments as shown for the instance example earlier:
// import CliBuilder not shown
import groovy.cli.OptionField
import groovy.cli.UnparsedField

@OptionField String audience
@OptionField Boolean help
@UnparsedField List remaining
new CliBuilder().parseFromInstance(this, args)
assert audience == 'Groovologist'
assert remaining == ['foo']
Options with arguments
We saw in our initial example that some options act like flags, e.g. Greeter -h but
others take an argument, e.g. Greeter --audience Groovologist. The simplest cases
involve options which act like flags or have a single (potentially optional) argument.
Here is an example involving those cases:
// import CliBuilder not shown
def cli = new CliBuilder()
cli.a(args: 0, 'a arg') (1)
cli.b(args: 1, 'b arg') (2)
cli.c(args: 1, optionalArg: true, 'c arg') (3)
def options = cli.parse('-a -b foo -c bar baz'.split()) (4)

assert options.a == true
assert options.b == 'foo'
assert options.c == 'bar'
assert options.arguments() == ['baz']

options = cli.parse('-a -c -b foo bar baz'.split()) (5)

assert options.a == true
assert options.c == true
assert options.b == 'foo'
assert options.arguments() == ['bar', 'baz']| 1 | An option that is simply a flag - the default; setting args to 0 is allowed but not needed. |
| 2 | An option with exactly one argument |
| 3 | An option with an optional argument; it acts like a flag if the option is left out |
| 4 | An example using this spec where an argument is supplied to the 'c' option |
| 5 | An example using this spec where no argument is supplied to the 'c' option; it’s just a flag |
Note: when an option with an optional argument is encountered, it will (somewhat) greedily consume the
next parameter from the supplied commandline parameters. If however, the next parameter matches a known long or short
option (with leading single or double hyphens), that will take precedence, e.g. -b in the above example.
Option arguments may also be specified using the annotation style. Here is an interface option specification illustrating such a definition:
interface WithArgsI {
    @Option boolean a()
    @Option String b()
    @Option(optionalArg=true) String[] c()
    @Unparsed List remaining()
}
And here is how it is used:
def cli = new CliBuilder()
def options = cli.parseFromSpec(WithArgsI, '-a -b foo -c bar baz'.split())
assert options.a()
assert options.b() == 'foo'
assert options.c() == ['bar']
assert options.remaining() == ['baz']

options = cli.parseFromSpec(WithArgsI, '-a -c -b foo bar baz'.split())
assert options.a()
assert options.c() == []
assert options.b() == 'foo'
assert options.remaining() == ['bar', 'baz']
This example makes use of an array-typed option specification. We cover this in more detail shortly when we discuss multiple arguments.
Specifying a type
Arguments on the commandline are by nature Strings (or arguably can be considered Booleans for flags) but can be converted to richer types automatically by supplying additional typing information. For the annotation-based argument definition style, these types are supplied using the field types for annotation properties or return types of annotated methods (or the setter argument type for setter methods). For the dynamic method style of argument definition a special 'type' property is supported which allows you to specify a Class name.
When an explicit type is defined, the args named-parameter is assumed to be 1 (except for Boolean-typed
options where it is 0 by default). An explicit args parameter can still be provided if needed.
Here is an example using types with the dynamic api argument definition style:
def argz = '''-a John -b -d 21 -e 1980 -f 3.5 -g 3.14159
    -h cv.txt -i DOWN and some more'''.split()
def cli = new CliBuilder()
cli.a(type: String, 'a-arg')
cli.b(type: boolean, 'b-arg')
cli.c(type: Boolean, 'c-arg')
cli.d(type: int, 'd-arg')
cli.e(type: Long, 'e-arg')
cli.f(type: Float, 'f-arg')
cli.g(type: BigDecimal, 'g-arg')
cli.h(type: File, 'h-arg')
cli.i(type: RoundingMode, 'i-arg')
def options = cli.parse(argz)
assert options.a == 'John'
assert options.b
assert !options.c
assert options.d == 21
assert options.e == 1980L
assert options.f == 3.5f
assert options.g == 3.14159
assert options.h == new File('cv.txt')
assert options.i == RoundingMode.DOWN
assert options.arguments() == ['and', 'some', 'more']
Primitives, numeric types, files, enums and arrays thereof, are supported (they are converted using org.codehaus.groovy.runtime.StringGroovyMethods#asType).
Custom parsing of the argument String
If the supported types aren’t sufficient, you can supply a closure to handle the String to rich type conversion for you. Here is a sample using the dynamic api style:
def argz = '''-a John -b Mary -d 2016-01-01 and some more'''.split()
def cli = new CliBuilder()
def lower = { it.toLowerCase() }
cli.a(convert: lower, 'a-arg')
cli.b(convert: { it.toUpperCase() }, 'b-arg')
cli.d(convert: { Date.parse('yyyy-MM-dd', it) }, 'd-arg')
def options = cli.parse(argz)
assert options.a == 'john'
assert options.b == 'MARY'
assert options.d.format('dd-MM-yyyy') == '01-01-2016'
assert options.arguments() == ['and', 'some', 'more']
Alternatively, you can use the annotation style by supplying the conversion closure as an annotation parameter. Here is an example specification:
interface WithConvertI {
    @Option(convert={ it.toLowerCase() }) String a()
    @Option(convert={ it.toUpperCase() }) String b()
    @Option(convert={ Date.parse("yyyy-MM-dd", it) }) Date d()
    @Unparsed List remaining()
}
And an example using that specification:
Date newYears = Date.parse("yyyy-MM-dd", "2016-01-01")
def argz = '''-a John -b Mary -d 2016-01-01 and some more'''.split()
def cli = new CliBuilder()
def options = cli.parseFromSpec(WithConvertI, argz)
assert options.a() == 'john'
assert options.b() == 'MARY'
assert options.d() == newYears
assert options.remaining() == ['and', 'some', 'more']
Options with multiple arguments
Multiple arguments are also supported using an args value greater than 1. There is a special named parameter,
valueSeparator, which can also be optionally used when processing multiple arguments. It allows some additional
flexibility in the syntax supported when supplying such argument lists on the commandline. For example,
supplying a value separator of ',' allows a comma-delimited list of values to be passed on the commandline.
The args value is normally an integer. It can be optionally supplied as a String. There are two special
String symbols: ` and `\*`.
The `*` value means 0 or more. The ` value means 1 or more.
The * value is the same as using + and also setting the optionalArg value to true.
Accessing the multiple arguments follows a special convention. Simply add an 's' to the normal property
you would use to access the argument option and you will retrieve all the supplied arguments as a list.
So, for a short option named 'a', you access the first 'a' argument using options.a and the list of
all arguments using options.as. It’s fine to have a shortname or longname ending in 's' so long as you
don’t also have the singular variant without the 's'. So, if name is one of your options with multiple arguments
and guess is another with a single argument, there will be no confusion using options.names and options.guess.
Here is an excerpt highlighting the use of multiple arguments:
// import CliBuilder not shown
def cli = new CliBuilder()
cli.a(args: 2, 'a-arg')
cli.b(args: '2', valueSeparator: ',', 'b-arg') (1)
cli.c(args: '+', valueSeparator: ',', 'c-arg') (2)

def options = cli.parse('-a 1 2 3 4'.split()) (3)
assert options.a == '1' (4)
assert options.as == ['1', '2'] (5)
assert options.arguments() == ['3', '4']

options = cli.parse('-a1 -a2 3'.split()) (6)
assert options.as == ['1', '2']
assert options.arguments() == ['3']

options = cli.parse(['-b1,2']) (7)
assert options.bs == ['1', '2']

options = cli.parse(['-c', '1'])
assert options.cs == ['1']

options = cli.parse(['-c1'])
assert options.cs == ['1']

options = cli.parse(['-c1,2,3'])
assert options.cs == ['1', '2', '3']| 1 | Args value supplied as a String and comma value separator specified |
| 2 | One or more arguments are allowed |
| 3 | Two commandline parameters will be supplied as the 'b' option’s list of arguments |
| 4 | Access the 'a' option’s first argument |
| 5 | Access the 'a' option’s list of arguments |
| 6 | An alternative syntax for specifying two arguments for the 'a' option |
| 7 | The arguments to the 'b' option supplied as a comma-separated value |
As an alternative to accessing multiple arguments using the plural name approach, you can use an array-based type for the option. In this case, all options will always be returned via the array which is accessed via the normal singular name. We’ll see an example of this next when discussing types.
Multiple arguments are also supported using the annotation style of option definition by using an array type for the annotated class member (method or property) as this example shows:
interface ValSepI {
    @Option(numberOfArguments=2) String[] a()
    @Option(numberOfArgumentsString='2', valueSeparator=',') String[] b()
    @Option(numberOfArgumentsString='+', valueSeparator=',') String[] c()
    @Unparsed remaining()
}
And used as follows:
def cli = new CliBuilder()

def options = cli.parseFromSpec(ValSepI, '-a 1 2 3 4'.split())
assert options.a() == ['1', '2']
assert options.remaining() == ['3', '4']

options = cli.parseFromSpec(ValSepI, '-a1 -a2 3'.split())
assert options.a() == ['1', '2']
assert options.remaining() == ['3']

options = cli.parseFromSpec(ValSepI, ['-b1,2'] as String[])
assert options.b() == ['1', '2']

options = cli.parseFromSpec(ValSepI, ['-c', '1'] as String[])
assert options.c() == ['1']

options = cli.parseFromSpec(ValSepI, ['-c1'] as String[])
assert options.c() == ['1']

options = cli.parseFromSpec(ValSepI, ['-c1,2,3'] as String[])
assert options.c() == ['1', '2', '3']
Types and multiple arguments
Here is an example using types and multiple arguments with the dynamic api argument definition style:
def argz = '''-j 3 4 5 -k1.5,2.5,3.5 and some more'''.split()
def cli = new CliBuilder()
cli.j(args: 3, type: int[], 'j-arg')
cli.k(args: '+', valueSeparator: ',', type: BigDecimal[], 'k-arg')
def options = cli.parse(argz)
assert options.js == [3, 4, 5] (1)
assert options.j == [3, 4, 5]  (1)
assert options.k == [1.5, 2.5, 3.5]
assert options.arguments() == ['and', 'some', 'more']| 1 | For an array type, the trailing 's' can be used but isn’t needed |
Setting a default value
Groovy makes it easy using the Elvis operator to provide a default value at the point of usage of some variable,
e.g. String x = someVariable ?: 'some default'. But sometimes you wish to make such a default part of the
options specification to minimise the interrogators work in later stages. CliBuilder supports the defaultValue
property to cater for this scenario.
Here is how you could use it using the dynamic api style:
def cli = new CliBuilder()
cli.f longOpt: 'from', type: String, args: 1, defaultValue: 'one', 'f option'
cli.t longOpt: 'to', type: int, defaultValue: '35', 't option'

def options = cli.parse('-f two'.split())
assert options.hasOption('f')
assert options.f == 'two'
assert !options.hasOption('t')
assert options.t == 35

options = cli.parse('-t 45'.split())
assert !options.hasOption('from')
assert options.from == 'one'
assert options.hasOption('to')
assert options.to == 45
Similarly, you might want such a specification using the annotation style. Here is an example using an interface specification:
interface WithDefaultValueI {
    @Option(shortName='f', defaultValue='one') String from()
    @Option(shortName='t', defaultValue='35') int to()
}
Which would be used like this:
def cli = new CliBuilder()

def options = cli.parseFromSpec(WithDefaultValueI, '-f two'.split())
assert options.from() == 'two'
assert options.to() == 35

options = cli.parseFromSpec(WithDefaultValueI, '-t 45'.split())
assert options.from() == 'one'
assert options.to() == 45
You can also use the defaultValue annotation attribute when using annotations with an instance,
though it’s probably just as easy to provide an initial value for the property (or backing field).
Use with TypeChecked
The dynamic api style of using CliBuilder is inherently dynamic but you have a few options
should you want to make use of Groovy’s static type checking capabilities. Firstly, consider using the
annotation style, for example, here is an interface option specification:
interface TypeCheckedI{
    @Option String name()
    @Option int age()
    @Unparsed List remaining()
}
And it can be used in combination with @TypeChecked as shown here:
@TypeChecked
void testTypeCheckedInterface() {
    def argz = "--name John --age 21 and some more".split()
    def cli = new CliBuilder()
    def options = cli.parseFromSpec(TypeCheckedI, argz)
    String n = options.name()
    int a = options.age()
    assert n == 'John' && a == 21
    assert options.remaining() == ['and', 'some', 'more']
}
Secondly, there is a feature of the dynamic api style which offers some support. The definition statements
are inherently dynamic but actually return a value which we have ignored in earlier examples.
The returned value is in fact a TypedOption<Type> and special getAt support allows the options
to be interrogated using the typed option, e.g. options[savedTypeOption]. So, if you have statements
similar to these in a non type checked part of your code:
def cli = new CliBuilder()
TypedOption<Integer> age = cli.a(longOpt: 'age', type: Integer, 'some age option')
Then, the following statements can be in a separate part of your code which is type checked:
def args = '--age 21'.split()
def options = cli.parse(args)
int a = options[age]
assert a == 21
Finally, there is one additional convenience method offered by CliBuilder to even allow the
definition part to be type checked. It is a slightly more verbose method call. Instead of using
the short name (the opt name) in the method call, you use a fixed name of option and
supply the opt value as a property. You must also specify the type directly as shown in
the following example:
import groovy.cli.TypedOption
import groovy.transform.TypeChecked

@TypeChecked
void testTypeChecked() {
    def cli = new CliBuilder()
    TypedOption<String> name = cli.option(String, opt: 'n', longOpt: 'name', 'name option')
    TypedOption<Integer> age = cli.option(Integer, longOpt: 'age', 'age option')
    def argz = "--name John --age 21 and some more".split()
    def options = cli.parse(argz)
    String n = options[name]
    int a = options[age]
    assert n == 'John' && a == 21
    assert options.arguments() == ['and', 'some', 'more']
}
Advanced CLI Usage
|
NOTE Advanced CLI features
|
Apache Commons CLI
As an example, here is some code for making use of Apache Commons CLI’s grouping mechanism:
import org.apache.commons.cli.*

def cli = new CliBuilder()
cli.f longOpt: 'from', 'f option'
cli.u longOpt: 'until', 'u option'
def optionGroup = new OptionGroup()
optionGroup.with {
  addOption cli.option('o', [longOpt: 'output'], 'o option')
  addOption cli.option('d', [longOpt: 'directory'], 'd option')
}
cli.options.addOptionGroup optionGroup
assert !cli.parse('-d -o'.split()) (1)| 1 | The parse will fail since only one option from a group can be used at a time. |
Picocli
Below are some features available in the picocli version of CliBuilder.
New property: errorWriter
When users of your application give invalid command line arguments,
CliBuilder writes an error message and the usage help message to the stderr output stream.
It doesn’t use the stdout stream to prevent the error message from being parsed when your program’s
output is used as input for another process.
You can customize the destination by setting the errorWriter to a different value.
On the other hand, CliBuilder.usage() prints the usage help message to the stdout stream.
This way, when users request help (e.g. with a --help parameter),
they can pipe the output to a utility like less or grep.
You can specify different writers for testing.
Be aware that for backwards compatibility, setting the writer property to a different value
will set both the writer and the errorWriter to the specified writer.
ANSI colors
The picocli version of CliBuilder renders the usage help message in ANSI colors on supported platforms automatically. If desired you can customize this. (An example follows below.)
New property: name
As before, you can set the synopsis of the usage help message with the usage property.
You may be interested in a small improvement:
if you only set the command name, a synopsis will be generated automatically,
with repeating elements followed by … and optional elements surrounded with [ and ].
(An example follows below.)
New property: usageMessage
This property exposes a UsageMessageSpec object from the underlying picocli library,
which gives fine-grained control over various sections of the usage help message. For example:
def cli = new CliBuilder()
cli.name = "myapp"
cli.usageMessage.with {
    headerHeading("@|bold,underline Header heading:|@%n")
    header("Header 1", "Header 2")                     // before the synopsis
    synopsisHeading("%n@|bold,underline Usage:|@ ")
    descriptionHeading("%n@|bold,underline Description heading:|@%n")
    description("Description 1", "Description 2")      // after the synopsis
    optionListHeading("%n@|bold,underline Options heading:|@%n")
    footerHeading("%n@|bold,underline Footer heading:|@%n")
    footer("Footer 1", "Footer 2")
}
cli.a('option a description')
cli.b('option b description')
cli.c(args: '*', 'option c description')
cli.usage()
Gives this output:
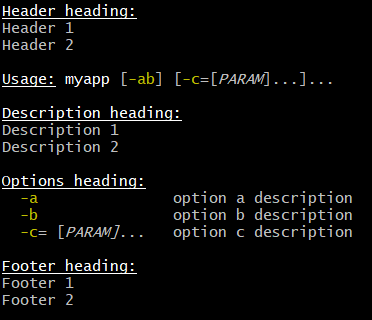
Property: parser
The parser property gives access to the picocli ParserSpec object that can be used to customize the parser behavior.
This can be useful when the CliBuilder options to control the parser are not fine-grained enough.
For example, for backward compatibility with the Commons CLI implementation of CliBuilder, by default CliBuilder stops looking for options when an unknown option is encountered, and subsequent command line arguments are treated as positional parameters.
CliBuilder provides a stopAtNonOption property, and by setting this to false you can make the parser more strict, so an unknown option results in error: Unknown option: '-x'.
But what if you want to treat unknown options as positional parameters, and still process subsequent command line arguments as options?
This can be accomplished with the parser property.
For example:
def cli = new CliBuilder()
cli.parser.stopAtPositional(false)
cli.parser.unmatchedOptionsArePositionalParams(true)
// ...
def opts = cli.parse(args)
// ...
See the documentation for details.
Map options
Finally, if your application has options that are key-value pairs, you may be interested in picocli’s support for maps. For example:
import java.util.concurrent.TimeUnit
import static java.util.concurrent.TimeUnit.DAYS
import static java.util.concurrent.TimeUnit.HOURS

def cli = new CliBuilder()
cli.D(args: 2,   valueSeparator: '=', 'the old way')                          (1)
cli.X(type: Map, 'the new way')                                               (2)
cli.Z(type: Map, auxiliaryTypes: [TimeUnit, Integer].toArray(), 'typed map')  (3)

def options = cli.parse('-Da=b -Dc=d -Xx=y -Xi=j -ZDAYS=2 -ZHOURS=23'.split())(4)
assert options.Ds == ['a', 'b', 'c', 'd']                                     (5)
assert options.Xs == [ 'x':'y', 'i':'j' ]                                     (6)
assert options.Zs == [ (DAYS as TimeUnit):2, (HOURS as TimeUnit):23 ] (7)| 1 | Previously, key=value pairs were split up into parts and added to a list |
| 2 | Picocli map support: simply specify Map as the type of the option |
| 3 | You can even specify the type of the map elements |
| 4 | To compare, let’s specify two key-value pairs for each option |
| 5 | Previously, all key-value pairs end up in a list and it is up to the application to work with this list |
| 6 | Picocli returns the key-value pairs as a Map |
| 7 | Both keys and values of the map can be strongly typed |
Controlling the Picocli version
To use a specific version of picocli, add a dependency to that version in your build configuration.
If running scripts using a pre-installed version of Groovy, use the @Grab annotation to control the version of picocli to use in CliBuilder.
@GrabConfig(systemClassLoader=true)
@Grab('info.picocli:picocli:4.2.0')
import groovy.cli.picocli.CliBuilder

def cli = new CliBuilder()
8.1.12. ObjectGraphBuilder
ObjectGraphBuilder is a builder for an arbitrary graph of beans that
follow the JavaBean convention. It is in particular useful for creating test data.
Let’s start with a list of classes that belong to your domain:
package com.acme

class Company {
    String name
    Address address
    List employees = []
}

class Address {
    String line1
    String line2
    int zip
    String state
}

class Employee {
    String name
    int employeeId
    Address address
    Company company
}
Then using ObjectGraphBuilder building a Company with three employees is as
easy as:
def builder = new ObjectGraphBuilder()                          (1)
builder.classLoader = this.class.classLoader                    (2)
builder.classNameResolver = "com.acme"                          (3)

def acme = builder.company(name: 'ACME') {                      (4)
    3.times {
        employee(id: it.toString(), name: "Drone $it") {        (5)
            address(line1:"Post street")                        (6)
        }
    }
}

assert acme != null
assert acme instanceof Company
assert acme.name == 'ACME'
assert acme.employees.size() == 3
def employee = acme.employees[0]
assert employee instanceof Employee
assert employee.name == 'Drone 0'
assert employee.address instanceof Address| 1 | creates a new object graph builder |
| 2 | sets the classloader where the classes will be resolved |
| 3 | sets the base package name for classes to be resolved |
| 4 | creates a Company instance |
| 5 | with 3 Employee instances |
| 6 | each of them having a distinct Address |
Behind the scenes, the object graph builder:
-
will try to match a node name into a
Class, using a defaultClassNameResolverstrategy that requires a package name -
then will create an instance of the appropriate class using a default
NewInstanceResolverstrategy that calls a no-arg constructor -
resolves the parent/child relationship for nested nodes, involving two other strategies:
-
RelationNameResolverwill yield the name of the child property in the parent, and the name of the parent property in the child (if any, in this case,Employeehas a parent property aptly namedcompany) -
ChildPropertySetterwill insert the child into the parent taking into account if the child belongs to aCollectionor not (in this caseemployeesshould be a list ofEmployeeinstances inCompany).
-
All 4 strategies have a default implementation that work as expected if the code follows the usual conventions for writing JavaBeans. In case any of your beans or objects do not follow the convention you may plug your own implementation of each strategy. For example imagine that you need to build a class which is immutable:
@Immutable
class Person {
    String name
    int age
}
Then if you try to create a Person with the builder:
def person = builder.person(name:'Jon', age:17)It will fail at runtime with:
Cannot set read-only property: name for class: com.acme.Person
Fixing this can be done by changing the new instance strategy:
builder.newInstanceResolver = { Class klazz, Map attributes ->
    if (klazz.getConstructor(Map)) {
        def o = klazz.newInstance(attributes)
        attributes.clear()
        return o
    }
    klazz.newInstance()
}
ObjectGraphBuilder supports ids per node, meaning
that you can store a reference to a node in the builder. This is
useful when multiple objects reference the same instance. Because a
property named id may be of business meaning in some domain models
ObjectGraphBuilder has a strategy named IdentifierResolver that you
may configure to change the default name value. The same may
happen with the property used for referencing a previously saved
instance, a strategy named ReferenceResolver will yield the
appropriate value (default is `refId'):
def company = builder.company(name: 'ACME') {
    address(id: 'a1', line1: '123 Groovy Rd', zip: 12345, state: 'JV')          (1)
    employee(name: 'Duke', employeeId: 1, address: a1)                          (2)
    employee(name: 'John', employeeId: 2 ){
      address( refId: 'a1' )                                                    (3)
    }
}| 1 | an address can be created with an id |
| 2 | an employee can reference the address directly with its id |
| 3 | or use the refId attribute corresponding to the id of the corresponding address |
Its worth mentioning that you cannot modify the properties of a referenced bean.
8.1.13. JmxBuilder
See Working with JMX - JmxBuilder for details.
8.1.14. FileTreeBuilder
groovy.util.FileTreeBuilder is a builder for generating a file directory structure from a specification. For example, to create the following tree:
 src/
  |--- main
  |     |--- groovy
  |            |--- Foo.groovy
  |--- test
        |--- groovy
               |--- FooTest.groovy
You can use a FileTreeBuilder like this:
tmpDir = File.createTempDir()
def fileTreeBuilder = new FileTreeBuilder(tmpDir)
fileTreeBuilder.dir('src') {
    dir('main') {
       dir('groovy') {
          file('Foo.groovy', 'println "Hello"')
       }
    }
    dir('test') {
       dir('groovy') {
          file('FooTest.groovy', 'class FooTest extends groovy.test.GroovyTestCase {}')
       }
    }
 }
To check that everything worked as expected we use the following `assert`s:
assert new File(tmpDir, '/src/main/groovy/Foo.groovy').text == 'println "Hello"'
assert new File(tmpDir, '/src/test/groovy/FooTest.groovy').text == 'class FooTest extends groovy.test.GroovyTestCase {}'
FileTreeBuilder also supports a shorthand syntax:
tmpDir = File.createTempDir()
def fileTreeBuilder = new FileTreeBuilder(tmpDir)
fileTreeBuilder.src {
    main {
       groovy {
          'Foo.groovy'('println "Hello"')
       }
    }
    test {
       groovy {
          'FooTest.groovy'('class FooTest extends groovy.test.GroovyTestCase {}')
       }
    }
 }
This produces the same directory structure as above, as shown by these `assert`s:
assert new File(tmpDir, '/src/main/groovy/Foo.groovy').text == 'println "Hello"'
assert new File(tmpDir, '/src/test/groovy/FooTest.groovy').text == 'class FooTest extends groovy.test.GroovyTestCase {}'
8.2. Creating a builder
While Groovy has many built-in builders, the builder pattern is so common,
you will no doubt eventually come across a building requirement that
hasn’t been catered for by those built-in builders.
The good news is that you can build your own.
You can do everything from scratch by relying on Groovy’s
metaprogramming capabilities. Alternatively, the BuilderSupport
and FactoryBuilderSupport classes make designing your own
builders much easier.
8.2.1. BuilderSupport
One approach to building a builder is to subclass BuilderSupport.
With this approach, the general idea is to override one or more of a number of
lifecycle methods including setParent, nodeCompleted and some or
all of the createNode methods from the BuilderSupport abstract class.
As an example, suppose we want to create a builder of
tracking athletic training programs. Each program is made
up of a number of sets and each set has its own steps.
A step might itself be a set of smaller steps.
For each set or step, we might wish to record
the distance required (or time), whether to repeat
the steps a certain number of times, whether to take a break
between each step and so forth.
For the simplicity of this example, we’ll capture the training
programming using maps and lists. A set has a list of steps.
Information like repeat count or distance will be tracked
in a map of attributes for each step and set.
The builder implementation is as follows:
-
Override a couple of the
createNodemethods. We’ll create a map capturing the set name, an empty list of steps, and potentially some attributes. -
Whenever we complete a node we’ll add the node to the list of steps for the parent (if any).
The code looks like this:
class TrainingBuilder1 extends BuilderSupport {
    protected createNode(name) {
        [name: name, steps: []]
    }

    protected createNode(name, Map attributes) {
        createNode(name) + attributes
    }

    void nodeCompleted(maybeParent, node) {
        if (maybeParent) maybeParent.steps << node
    }

    // unused lifecycle methods
    protected void setParent(parent, child) { }
    protected createNode(name, Map attributes, value) { }
    protected createNode(name, value) { }
}
Next, we’ll write a little helper method which recursively adds up the distances of all substeps, accounting for repeated steps as needed.
def total(map) {
    if (map.distance) return map.distance
    def repeat = map.repeat ?: 1
    repeat * map.steps.sum{ total(it) }
}
Finally, we can now use our builder and helper method to create a swimming training program and check its total distance:
def training = new TrainingBuilder1()

def monday = training.swimming {
    warmup(repeat: 3) {
        freestyle(distance: 50)
        breaststroke(distance: 50)
    }
    endurance(repeat: 20) {
        freestyle(distance: 50, break: 15)
    }
    warmdown {
        kick(distance: 100)
        choice(distance: 100)
    }
}

assert 1500 == total(monday)
8.2.2. FactoryBuilderSupport
A second approach to building a builder is to subclass FactoryBuilderSupport.
This builder has similar goals to BuilderSupport but with extra features
to simplify domain class construction.
With this approach, the general idea is to override one or more of a number of
lifecycle methods including resolveFactory, nodeCompleted and postInstantiate methods from the FactoryBuilderSupport abstract class.
We’ll use the same example as for the previous BuilderSupport example;
a builder of tracking athletic training programs.
For this example, rather than capturing the training programming using maps and lists, we’ll use some simple domain classes.
The builder implementation is as follows:
-
Override the
resolveFactorymethod to return a special factory which returns classes by capitalizing the names used in our mini DSL. -
Whenever we complete a node we’ll add the node to the list of steps for the parent (if any).
The code, including the code for the special factory class, looks like this:
import static org.apache.groovy.util.BeanUtils.capitalize

class TrainingBuilder2 extends FactoryBuilderSupport {
    def factory = new TrainingFactory(loader: getClass().classLoader)

    protected Factory resolveFactory(name, Map attrs, value) {
        factory
    }

    void nodeCompleted(maybeParent, node) {
        if (maybeParent) maybeParent.steps << node
    }
}

class TrainingFactory extends AbstractFactory {
    ClassLoader loader
    def newInstance(FactoryBuilderSupport fbs, name, value, Map attrs) {
        def clazz = loader.loadClass(capitalize(name))
        value ? clazz.newInstance(value: value) : clazz.newInstance()
    }
}
Rather than using lists and maps, we’ll have some simple domain classes and related traits:
trait HasDistance {
    int distance
}

trait Container extends HasDistance {
    List steps = []
    int repeat
}

class Cycling implements Container { }

class Interval implements Container { }

class Sprint implements HasDistance {}

class Tempo implements HasDistance {}
Just like for the BuilderSupport example, it is useful to have a helper method
to calculate the total distance covered during the training session.
The implementation is very similar to our earlier example, but is adjusted
to work well with our newly defined traits.
def total(HasDistance c) {
    c.distance
}

def total(Container c) {
    if (c.distance) return c.distance
    def repeat = c.repeat ?: 1
    repeat * c.steps.sum{ total(it) }
}
Finally, we can now use our new builder and helper methods to create a cycling training program and check its total distance:
def training = new TrainingBuilder2()

def tuesday = training.cycling {
    interval(repeat: 5) {
        sprint(distance: 400)
        tempo(distance: 3600)
    }
}

assert 20000 == total(tuesday)